Apache Kafka
Contents
Introduction
In Big Data, an enormous volume of data is used. Regarding data, we have two main challenges.The first challenge is how to collect large volume of data and the second challenge is to analyze the collected data. To overcome those challenges, you must need a messaging system.
Kafka is designed for distributed high throughput systems. Kafka tends to work very well as a replacement for a more traditional message broker. In comparison to other messaging systems, Kafka has better throughput, built-in partitioning, replication and inherent fault-tolerance, which makes it a good fit for large-scale message processing applications.
What is a Messaging System?
A Messaging System is responsible for transferring data from one application to another, so the applications can focus on data, but not worry about how to share it. Distributed messaging is based on the concept of reliable message queuing. Messages are queued asynchronously between client applications and messaging system. Two types of messaging patterns are available − one is point to point and the other is publish-subscribe (pub-sub) messaging system. Most of the messaging patterns follow pub-sub.
Point to Point Messaging System
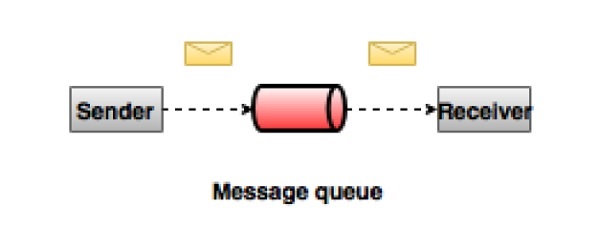
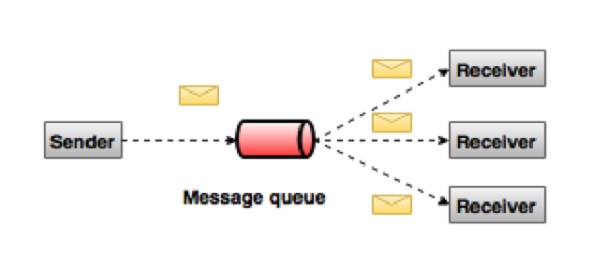
In a point-to-point system, messages are persisted in a queue. One or more consumers can consume the messages in the queue, but a particular message can be consumed by a maximum of one consumer only. Once a consumer reads a message in the queue, it disappears from that queue. The typical example of this system is an Order Processing System, where each order will be processed by one Order Processor, but Multiple Order Processors can work as well at the same time. The following diagram depicts the structure.
Publish-Subscribe Messaging System
In the publish-subscribe system, messages are persisted in a topic. Unlike point-to-point system, consumers can subscribe to one or more topic and consume all the messages in that topic. In the Publish-Subscribe system, message producers are called publishers and message consumers are called subscribers. A real-life example is Dish TV, which publishes different channels like sports, movies, music, etc., and anyone can subscribe to their own set of channels and get them whenever their subscribed channels are available.
What is Kafka?
Apache Kafka is a distributed publish-subscribe messaging system and a robust queue that can handle a high volume of data and enables you to pass messages from one end-point to another. Kafka is suitable for both offline and online message consumption. Kafka messages are persisted on the disk and replicated within the cluster to prevent data loss. Kafka is built on top of the ZooKeeper synchronization service. It integrates very well with Apache Storm and Spark for real-time streaming data analysis.
Benefits
Following are a few benefits of Kafka −
- Reliability − Kafka is distributed, partitioned, replicated and fault tolerance.
- Scalability − Kafka messaging system scales easily without down time..
- Durability − Kafka uses Distributed commit log which means messages persists on disk as fast as possible, hence it is durable..
- Performance − Kafka has high throughput for both publishing and subscribing messages. It maintains stable performance even many TB of messages are stored.
Kafka is very fast and guarantees zero downtime and zero data loss.
Use Cases
Kafka can be used in many Use Cases. Some of them are listed below −
- Metrics − Kafka is often used for operational monitoring data. This involves aggregating statistics from distributed applications to produce centralized feeds of operational data.
- Log Aggregation Solution − Kafka can be used across an organization to collect logs from multiple services and make them available in a standard format to multiple con-sumers.
- Stream Processing − Popular frameworks such as Storm and Spark Streaming read data from a topic, processes it, and write processed data to a new topic where it becomes available for users and applications. Kafka’s strong durability is also very useful in the context of stream processing.
Need for Kafka
Kafka is a unified platform for handling all the real-time data feeds. Kafka supports low latency message delivery and gives guarantee for fault tolerance in the presence of machine failures. It has the ability to handle a large number of diverse consumers. Kafka is very fast, performs 2 million writes/sec. Kafka persists all data to the disk, which essentially means that all the writes go to the page cache of the OS (RAM). This makes it very efficient to transfer data from page cache to a network socket.
Apache Kafka - Fundamentals
Before moving deep into the Kafka, you must aware of the main terminologies such as topics, brokers, producers and consumers. The following diagram illustrates the main terminologies and the table describes the diagram components in detail.
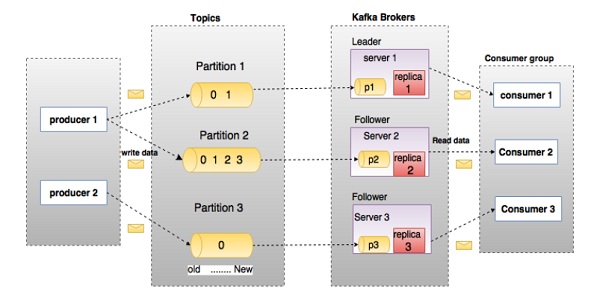
In the above diagram, a topic is configured into three partitions. Partition 1 has two offset factors 0 and 1. Partition 2 has four offset factors 0, 1, 2, and 3. Partition 3 has one offset factor 0. The id of the replica is same as the id of the server that hosts it.
Assume, if the replication factor of the topic is set to 3, then Kafka will create 3 identical replicas of each partition and place them in the cluster to make available for all its operations. To balance a load in cluster, each broker stores one or more of those partitions. Multiple producers and consumers can publish and retrieve messages at the same time.
| S.No | Components and Description |
|---|---|
| 1 | Topics A stream of messages belonging to a particular category is called a topic. Data is stored in topics. Topics are split into partitions. For each topic, Kafka keeps a mini-mum of one partition. Each such partition contains messages in an immutable ordered sequence. A partition is implemented as a set of segment files of equal sizes. |
| 2 | Partition Topics may have many partitions, so it can handle an arbitrary amount of data. |
| 3 |
Partition offset Each partitioned message has a unique sequence id called as |
| 4 |
Replicas of partition Replicas are nothing but |
| 5 |
Brokers
|
| 6 |
Kafka Cluster Kafka’s having more than one broker are called as Kafka cluster. A Kafka cluster can be expanded without downtime. These clusters are used to manage the persistence and replication of message data. |
| 7 |
Producers Producers are the publisher of messages to one or more Kafka topics. Producers send data to Kafka brokers. Every time a producer pub-lishes a message to a broker, the broker simply appends the message to the last segment file. Actually, the message will be appended to a partition. Producer can also send messages to a partition of their choice. |
| 8 |
Consumers Consumers read data from brokers. Consumers subscribes to one or more topics and consume published messages by pulling data from the brokers. |
| 9 |
Leader
|
| 10 |
Follower Node which follows leader instructions are called as follower. If the leader fails, one of the follower will automatically become the new leader. A follower acts as normal consumer, pulls messages and up-dates its own data store. |
Apache Kafka - Cluster Architecture
Take a look at the following illustration. It shows the cluster diagram of Kafka.
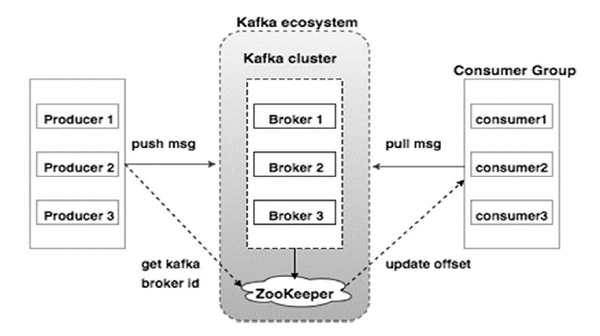
The following table describes each of the components shown in the above diagram.
| S.No | Components and Description |
|---|---|
| 1 |
Broker Kafka cluster typically consists of multiple brokers to maintain load balance. Kafka brokers are stateless, so they use ZooKeeper for maintaining their cluster state. One Kafka broker instance can handle hundreds of thousands of reads and writes per second and each bro-ker can handle TB of messages without performance impact. Kafka broker leader election can be done by ZooKeeper. |
| 2 |
ZooKeeper ZooKeeper is used for managing and coordinating Kafka broker. ZooKeeper service is mainly used to notify producer and consumer about the presence of any new broker in the Kafka system or failure of the broker in the Kafka system. As per the notification received by the Zookeeper regarding presence or failure of the broker then pro-ducer and consumer takes decision and starts coordinating their task with some other broker. |
| 3 |
Producers Producers push data to brokers. When the new broker is started, all the producers search it and automatically sends a message to that new broker. Kafka producer doesn’t wait for acknowledgements from the broker and sends messages as fast as the broker can handle. |
| 4 |
Consumers Since Kafka brokers are stateless, which means that the consumer has to maintain how many messages have been consumed by using partition offset. If the consumer acknowledges a particular message offset, it implies that the consumer has consumed all prior messages. The consumer issues an asynchronous pull request to the broker to have a buffer of bytes ready to consume. The consumers can rewind or skip to any point in a partition simply by supplying an offset value. Consumer offset value is notified by ZooKeeper. |
Apache Kafka - WorkFlow
As of now, we discussed the core concepts of Kafka. Let us now throw some light on the workflow of Kafka.
Kafka is simply a collection of topics split into one or more partitions. A Kafka partition is a linearly ordered sequence of messages, where each message is identified by their index (called as offset). All the data in a Kafka cluster is the disjointed union of partitions. Incoming messages are written at the end of a partition and messages are sequentially read by consumers. Durability is provided by replicating messages to different brokers.
Kafka provides both pub-sub and queue based messaging system in a fast, reliable, persisted, fault-tolerance and zero downtime manner. In both cases, producers simply send the message to a topic and consumer can choose any one type of messaging system depending on their need. Let us follow the steps in the next section to understand how the consumer can choose the messaging system of their choice.
Workflow of Pub-Sub Messaging
Following is the step wise workflow of the Pub-Sub Messaging −
- Producers send message to a topic at regular intervals.
- Kafka broker stores all messages in the partitions configured for that particular topic. It ensures the messages are equally shared between partitions. If the producer sends two messages and there are two partitions, Kafka will store one message in the first partition and the second message in the second partition.
- Consumer subscribes to a specific topic.
- Once the consumer subscribes to a topic, Kafka will provide the current offset of the topic to the consumer and also saves the offset in the Zookeeper ensemble.
- Consumer will request the Kafka in a regular interval (like 100 Ms) for new messages.
- Once Kafka receives the messages from producers, it forwards these messages to the consumers.
- Consumer will receive the message and process it.
- Once the messages are processed, consumer will send an acknowledgement to the Kafka broker.
- Once Kafka receives an acknowledgement, it changes the offset to the new value and updates it in the Zookeeper. Since offsets are maintained in the Zookeeper, the consumer can read next message correctly even during server outrages.
- This above flow will repeat until the consumer stops the request.
- Consumer has the option to rewind/skip to the desired offset of a topic at any time and read all the subsequent messages.
Workflow of Queue Messaging / Consumer Group
In a queue messaging system instead of a single consumer, a group of consumers having the same Group ID will subscribe to a topic. In simple terms, consumers subscribing to a topic with same Group ID are considered as a single group and the messages are shared among them. Let us check the actual workflow of this system.
- Producers send message to a topic in a regular interval.
- Kafka stores all messages in the partitions configured for that particular topic similar to the earlier scenario.
- A single consumer subscribes to a specific topic, assume Topic-01 with Group ID as Group-1.
- Kafka interacts with the consumer in the same way as Pub-Sub Messaging until new consumer subscribes the same topic, Topic-01 with the same Group ID as Group-1.
- Once the new consumer arrives, Kafka switches its operation to share mode and shares the data between the two consumers. This sharing will go on until the number of con-sumers reach the number of partition configured for that particular topic.
- Once the number of consumer exceeds the number of partitions, the new consumer will not receive any further message until any one of the existing consumer unsubscribes. This scenario arises because each consumer in Kafka will be assigned a minimum of one partition and once all the partitions are assigned to the existing consumers, the new consumers will have to wait.
- This feature is also called as Consumer Group. In the same way, Kafka will provide the best of both the systems in a very simple and efficient manner.
Role of ZooKeeper
A critical dependency of Apache Kafka is Apache Zookeeper, which is a distributed configuration and synchronization service. Zookeeper serves as the coordination interface between the Kafka brokers and consumers. The Kafka servers share information via a Zookeeper cluster. Kafka stores basic metadata in Zookeeper such as information about topics, brokers, consumer offsets (queue readers) and so on.
Since all the critical information is stored in the Zookeeper and it normally replicates this data across its ensemble, failure of Kafka broker / Zookeeper does not affect the state of the Kafka cluster. Kafka will restore the state, once the Zookeeper restarts. This gives zero downtime for Kafka. The leader election between the Kafka broker is also done by using Zookeeper in the event of leader failure.
To learn more on Zookeeper, please refer zookeeper
Let us continue further on how to install Java, ZooKeeper, and Kafka on your machine in the next chapter.
Apache Kafka - Installation Steps
ZooKeeper Framework Installation
Download ZooKeeper
To install ZooKeeper framework on your machine, visit the following link and download the latest version of ZooKeeper.
http://zookeeper.apache.org/releases.html
Create Configuration File
Open Configuration File named conf/zoo.cfg using the command vi “conf/zoo.cfg” and all the following parameters to set as starting point.
$ vi conf/zoo.cfg
tickTime=2000
dataDir=/path/to/zookeeper/data
clientPort=2181
initLimit=5
syncLimit=2
Once the configuration file has been saved successfully and return to terminal again, you can start the zookeeper server.
Start ZooKeeper Server
$ bin/zkServer.sh startAfter executing this command, you will get a response as shown below −
$ JMX enabled by default
$ Using config: /Users/../zookeeper-3.4.6/bin/../conf/zoo.cfg
$ Starting zookeeper ... STARTED
Start CLI
$ bin/zkCli.shAfter typing the above command, you will be connected to the zookeeper server and will get the below response.
Connecting to localhost:2181
................
................
................
Welcome to ZooKeeper!
................
................
WATCHER::
WatchedEvent state:SyncConnected type: None path:null
[zk: localhost:2181(CONNECTED) 0]
Stop Zookeeper Server
After connecting the server and performing all the operations, you can stop the zookeeper server with the following command −
$ bin/zkServer.sh stopNow you have successfully installed Java and ZooKeeper on your machine. Let us see the steps to install Apache Kafka.
Apache Kafka Installation
Let us continue with the following steps to install Kafka on your machine.
Download Kafka
https://kafka.apache.org/quickstart
https://www.apache.org/dyn/closer.cgi?path=/kafka/2.1.0/kafka_2.11-2.1.0.tgz
Start Server
You can start the server by giving the following command −
$ bin/kafka-server-start.sh config/server.propertiesAfter the server starts, you would see the below response on your screen −
$ bin/kafka-server-start.sh config/server.properties
[2016-01-02 15:37:30,410] INFO KafkaConfig values:
request.timeout.ms = 30000
log.roll.hours = 168
inter.broker.protocol.version = 0.9.0.X
log.preallocate = false
security.inter.broker.protocol = PLAINTEXT
…………………………………………….
…………………………………………….
Stop the Server
After performing all the operations, you can stop the server using the following command −
$ bin/kafka-server-stop.sh config/server.propertiesNow that we have already discussed the Kafka installation, we can learn how to perform basic operations on Kafka in the next chapter.
Docker Image Installation
Installation For 'Kafka developers' with Kafka, Registry, Connect, Landoop, Stream-Reactor, KCQL
Docker Pull Command
docker pull landoop/fast-data-devWhen you need:
- A Kafka distribution with Apache Kafka, Kafka Connect, Zookeeper, Confluent Schema Registry and REST Proxy
- Landoop Lenses or kafka-topics-ui, schema-registry-ui, kafka-connect-ui
- Landoop Stream Reactor, 25+ Kafka Connectors to simplify ETL processes
- Integration testing and examples embedded into the docker
just run:
docker run --rm --net=host landoop/fast-data-devThat's it. Visit http://localhost:3030 to get into the fast-data-dev environment
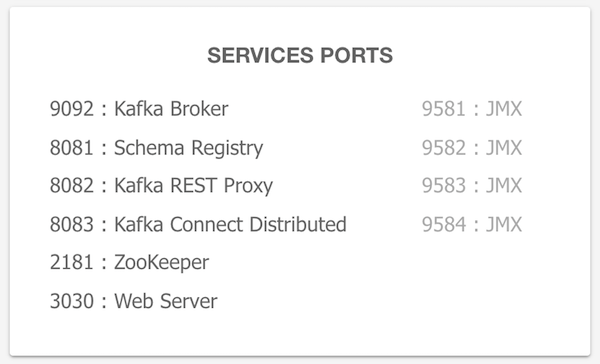
All the service ports are exposed, and can be used from localhost / or within your IntelliJ. The kafka broker is exposed by default at port 9092, zookeeper at port 2181, schema registry at 8081, connect at 8083. As an example, to access the JMX data of the broker run:
jconsole localhost:9581If you want to have the services remotely accessible, then you may need to pass in your machine's IP address or hostname that other machines can use to access it:
docker run --rm --net=host -e ADV_HOST=<IP> landoop/fast-data-dev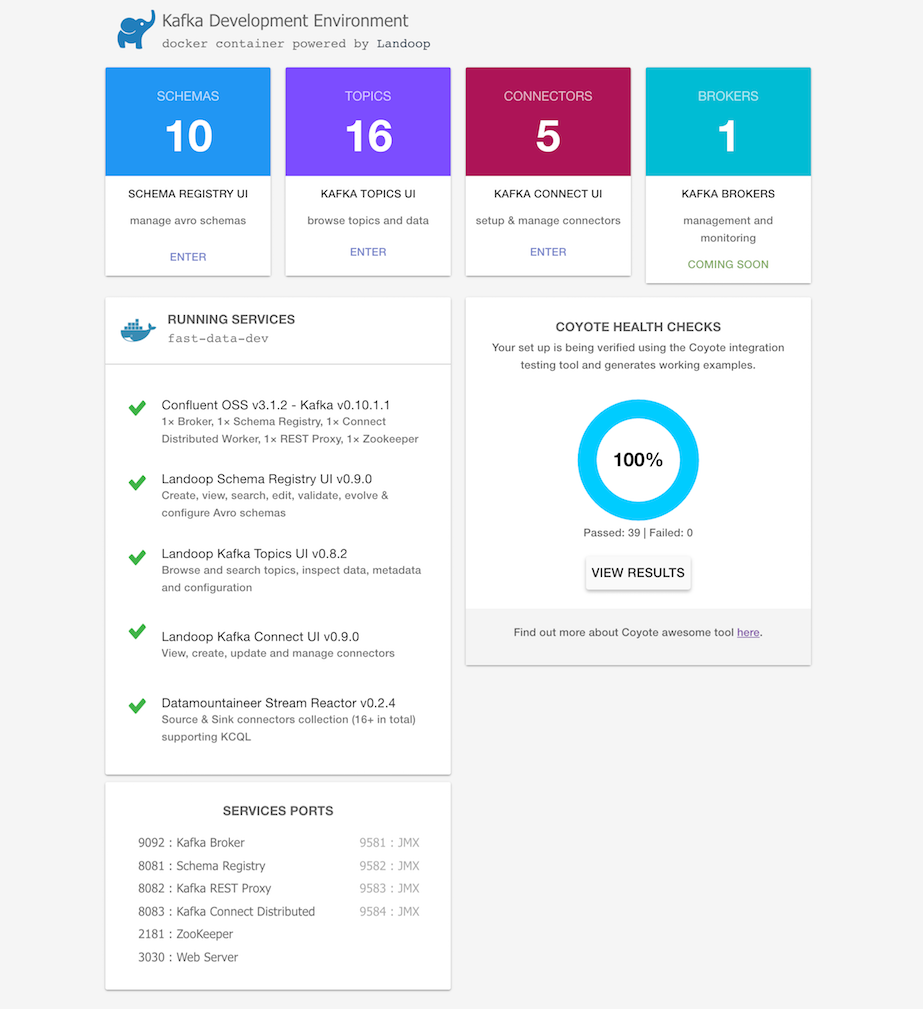
Mac and Windows users (docker-machine)
Create a VM with 4+GB RAM using Docker Machine:
docker-machine create --driver virtualbox --virtualbox-memory 4096 landoopRun docker-machine ls to verify that the Docker Machine is running correctly. The command's output should be similar to:
$ docker-machine lsConfigure your terminal to be able to use the new Docker Machine named landoop:
eval $(docker-machine env landoop)And run the Kafka Development Environment. Define ports, advertise the hostname and use extra parameters:
docker run --rm -p 2181:2181 -p 3030:3030 -p 8081-8083:8081-8083 \
       -p 9581-9585:9581-9585 -p 9092:9092 -e ADV_HOST=192.168.99.100 \
       landoop/fast-data-dev:latest
That's it. Visit http://192.168.99.100:3030 to get into the fast-data-dev environment
Run on the Cloud
You may want to quickly run a Kafka instance in GCE or AWS and access it from your local computer. Fast-data-dev has you covered.
Start a VM in the respective cloud. You can use the OS of your choice, provided it has a docker package. CoreOS is a nice choice as you get docker out of the box.
Next you have to open the firewall, both for your machines but also for the VM itself. This is important!
Once the firewall is open try:
docker run -d --net=host -e ADV_HOST=[VM_EXTERNAL_IP] \
           -e RUNNING_SAMPLEDATA=1 landoop/fast-data-dev
Alternatively just export the ports you need. E.g:
docker run -d -p 2181:2181 -p 3030:3030 -p 8081-8083:8081-8083 \
           -p 9581-9585:9581-9585 -p 9092:9092 -e ADV_HOST=[VM_EXTERNAL_IP] \
           -e RUNNING_SAMPLEDATA=1 landoop/fast-data-dev
Enjoy Kafka, Schema Registry, Connect, Landoop UIs and Stream Reactor.
Building it Fast-data-dev/kafka-lenses-dev require a recent version of docker which supports multistage builds.
To build it just run:
docker build -t landoop/fast-data-dev .Periodically pull from docker hub to refresh your cache.
If you have an older version installed, try the single-stage build at the expense of the extra size:
docker build -t landoop/fast-data-dev -f Dockerfile-singlestage .Execute kafka command line tools
Do you need to execute kafka related console tools? Whilst your Kafka containers is running, try something like:
docker run --rm -it --net=host landoop/fast-data-dev kafka-topics --zookeeper localhost:2181 --listOr enter the container to use any tool as you like:
docker run --rm -it --net=host landoop/fast-data-dev bashView logs You can view the logs from the web interface. If you prefer the command line, every application stores its logs under /var/log inside the container. If you have your container's ID, or name, you could do something like:
docker exec -it <ID> cat /var/log/broker.logsource : https://hub.docker.com/r/landoop/fast-data-dev
Apache Kafka - Basic Operations
First let us start implementing single node-single broker configuration and we will then migrate our setup to single node-multiple brokers configuration.
Hopefully you would have installed Java, ZooKeeper and Kafka on your machine by now. Before moving to the Kafka Cluster Setup, first you would need to start your ZooKeeper because Kafka Cluster uses ZooKeeper.
Start ZooKeeper
Open a new terminal and type the following command −
bin/zookeeper-server-start.sh config/zookeeper.propertiesTo start Kafka Broker, type the following command −
bin/kafka-server-start.sh config/server.propertiesAfter starting Kafka Broker, type the command jps on ZooKeeper terminal and you would see the following response −
821 QuorumPeerMain
928 Kafka
931 Jps
Now you could see two daemons running on the terminal where QuorumPeerMain is ZooKeeper daemon and another one is Kafka daemon.
Single Node-Single Broker Configuration
In this configuration you have a single ZooKeeper and broker id instance. Following are the steps to configure it −
Creating a Kafka Topic − Kafka provides a command line utility named kafka-topics.sh to create topics on the server. Open new terminal and type the below example.
Syntax
bin/kafka-topics.sh --create --zookeeper localhost:2181 --replication-factor 1
--partitions 1 --topic topic-name
Example
bin/kafka-topics.sh --create --zookeeper localhost:2181 --replication-factor 1
--partitions 1 --topic Hello-Kafka
We just created a topic named Hello-Kafka with a single partition and one replica factor. The above created output will be similar to the following output −
Output − Created topic Hello-Kafka
Once the topic has been created, you can get the notification in Kafka broker terminal window and the log for the created topic specified in “/tmp/kafka-logs/“ in the config/server.properties file.
List of Topics
To get a list of topics in Kafka server, you can use the following command −
Syntax
bin/kafka-topics.sh --list --zookeeper localhost:2181Output
Hello-KafkaSince we have created a topic, it will list out Hello-Kafka only. Suppose, if you create more than one topics, you will get the topic names in the output.
Start Producer to Send Messages Syntax
bin/kafka-console-producer.sh --broker-list localhost:9092 --topic topic-nameFrom the above syntax, two main parameters are required for the producer command line client −
Broker-list − The list of brokers that we want to send the messages to. In this case we only have one broker. The Config/server.properties file contains broker port id, since we know our broker is listening on port 9092, so you can specify it directly.
Topic name − Here is an example for the topic name.
Example
bin/kafka-console-producer.sh --broker-list localhost:9092 --topic Hello-KafkaThe producer will wait on input from stdin and publishes to the Kafka cluster. By default, every new line is published as a new message then the default producer properties are specified in config/producer.properties file. Now you can type a few lines of messages in the terminal as shown below.
Output
$ bin/kafka-console-producer.sh --broker-list localhost:9092
--topic Hello-Kafka[2016-01-16 13:50:45,931]
WARN property topic is not valid (kafka.utils.Verifia-bleProperties)
Hello
My first message
My second message
Start Consumer to Receive Messages
Similar to producer, the default consumer properties are specified in config/consumer.proper-ties file. Open a new terminal and type the below syntax for consuming messages.
Syntax
bin/kafka-console-consumer.sh --zookeeper localhost:2181 —topic topic-name --from-beginningExample
bin/kafka-console-consumer.sh --zookeeper localhost:2181 —topic Hello-Kafka --from-beginningOutput
Hello
My first message
My second message
Finally, you are able to enter messages from the producer’s terminal and see them appearing in the consumer’s terminal. As of now, you have a very good understanding on the single node cluster with a single broker. Let us now move on to the multiple brokers configuration.
Single Node-Multiple Brokers Configuration
Before moving on to the multiple brokers cluster setup, first start your ZooKeeper server.
Create Multiple Kafka Brokers − We have one Kafka broker instance already in con-fig/server.properties. Now we need multiple broker instances, so copy the existing server.prop-erties file into two new config files and rename it as server-one.properties and server-two.prop-erties. Then edit both new files and assign the following changes −
config/server-one.properties
# The id of the broker. This must be set to a unique integer for each broker.
broker.id=1
# The port the socket server listens on
port=9093
# A comma seperated list of directories under which to store log files
log.dirs=/tmp/kafka-logs-1
config/server-two.properties
# The id of the broker. This must be set to a unique integer for each broker.
broker.id=2
# The port the socket server listens on
port=9094
# A comma seperated list of directories under which to store log files
log.dirs=/tmp/kafka-logs-2
Start Multiple Brokers− After all the changes have been made on three servers then open three new terminals to start each broker one by one.
Broker1
bin/kafka-server-start.sh config/server.properties
Broker2
bin/kafka-server-start.sh config/server-one.properties
Broker3
bin/kafka-server-start.sh config/server-two.properties
Now we have three different brokers running on the machine. Try it by yourself to check all the daemons by typing jps on the ZooKeeper terminal, then you would see the response.
Creating a Topic
Let us assign the replication factor value as three for this topic because we have three different brokers running. If you have two brokers, then the assigned replica value will be two.
Syntax
bin/kafka-topics.sh --create --zookeeper localhost:2181 --replication-factor 3
-partitions 1 --topic topic-name
Example
bin/kafka-topics.sh --create --zookeeper localhost:2181 --replication-factor 3
-partitions 1 --topic Multibrokerapplication
Output
created topic “Multibrokerapplication”
The Describe command is used to check which broker is listening on the current created topic as shown below −

bin/kafka-topics.sh --describe --zookeeper localhost:2181
--topic Multibrokerappli-cation
Output
bin/kafka-topics.sh --describe --zookeeper localhost:2181
--topic Multibrokerappli-cation

Topic:Multibrokerapplication    PartitionCount:1
ReplicationFactor:3 Configs:

Topic:Multibrokerapplication Partition:0 Leader:0
Replicas:0,2,1 Isr:0,2,1
From the above output, we can conclude that first line gives a summary of all the partitions, showing topic name, partition count and the replication factor that we have chosen already. In the second line, each node will be the leader for a randomly selected portion of the partitions.
In our case, we see that our first broker (with broker.id 0) is the leader. Then Replicas:0,2,1 means that all the brokers replicate the topic finally Isr is the set of in-sync replicas. Well, this is the subset of replicas that are currently alive and caught up by the leader.
Start Producer to Send Messages
This procedure remains the same as in the single broker setup.
Example
bin/kafka-console-producer.sh --broker-list localhost:9092
--topic Multibrokerapplication
Output
bin/kafka-console-producer.sh --broker-list localhost:9092 --topic Multibrokerapplication
[2016-01-20 19:27:21,045] WARN Property topic is not valid (kafka.utils.Verifia-bleProperties)
This is single node-multi broker demo
This is the second message
Start Consumer to Receive Messages
This procedure remains the same as shown in the single broker setup.
Example
bin/kafka-console-consumer.sh --zookeeper localhost:2181
—topic Multibrokerapplica-tion --from-beginning
Output
bin/kafka-console-consumer.sh --zookeeper localhost:2181
—topic Multibrokerapplica-tion —from-beginning
This is single node-multi broker demo
This is the second message
Basic Topic Operations
In this chapter we will discuss the various basic topic operations.
Modifying a Topic
As you have already understood how to create a topic in Kafka Cluster. Now let us modify a created topic using the following command
Syntax
bin/kafka-topics.sh —zookeeper localhost:2181 --alter --topic topic_name
--parti-tions count
Example
We have already created a topic “Hello-Kafka” with single partition count and one replica factor.
Now using “alter” command we have changed the partition count.

bin/kafka-topics.sh --zookeeper localhost:2181
--alter --topic Hello-kafka --parti-tions 2
Output
WARNING: If partitions are increased for a topic that has a key, the partition logic or ordering of the messages will be affected Adding partitions succeeded! Deleting a Topic To delete a topic, you can use the following syntax.
Syntax
bin/kafka-topics.sh --zookeeper localhost:2181 --delete --topic topic_nameExample
bin/kafka-topics.sh --zookeeper localhost:2181 --delete --topic Hello-kafkaOutput
> Topic Hello-kafka marked for deletion Note −This will have no impact if delete.topic.enable is not set to true
source: https://www.tutorialspoint.com/apache_kafka/apache_kafka_simple_producer_example.htm